(EN) Install macOS Big Sur Beta on UNSUPPORTED Macs
Category:
- Preparation
- Installation
- Rollback
Actually, the reason why I wrote this article in English is that I didn’t want to translate so many lists into Chinese lol. As I’m used to speak German for such long time, maybe there’s some grammar mistakes, so please feel free to tell me when you have any questions.
Here’re many highlights in the upcoming macOS Big Sur, such as the change of design language, widgets, etc. So maybe it’s such great power for driving many Mac users to update their Macs in the future. However, many older Macs are unable to update to Big Sur according to the official list from Apple, though some of them run really well with macOS Catalina.
Devices are supported as follows:
1 | MacBook: Early 2015 or newer |
My mostly-used Mac is MacBook Pro 15-inch with Retina Display(Early 2013), theoretically it’s unable to update to Big Sur. However, I still want to have a try, and it does succeed. So I want share my experience to those who also want to install macOS Big Sur Beta on unsupported Macs.
Warnings: Till Big Sur Developer Beta 3, there’s still lots of bugs and unfinished features, so it A MUST to take snapshots by Time Machine before installation and get ready to rollback, whether your Mac is supported or not. As far as I am concerned, it’s not a wise choice to use Developer Beta version as a daily-used OS, if you’re not a developer who works on it.
For example, just look at the widget lol.

Preparation
Working Status
- System working status
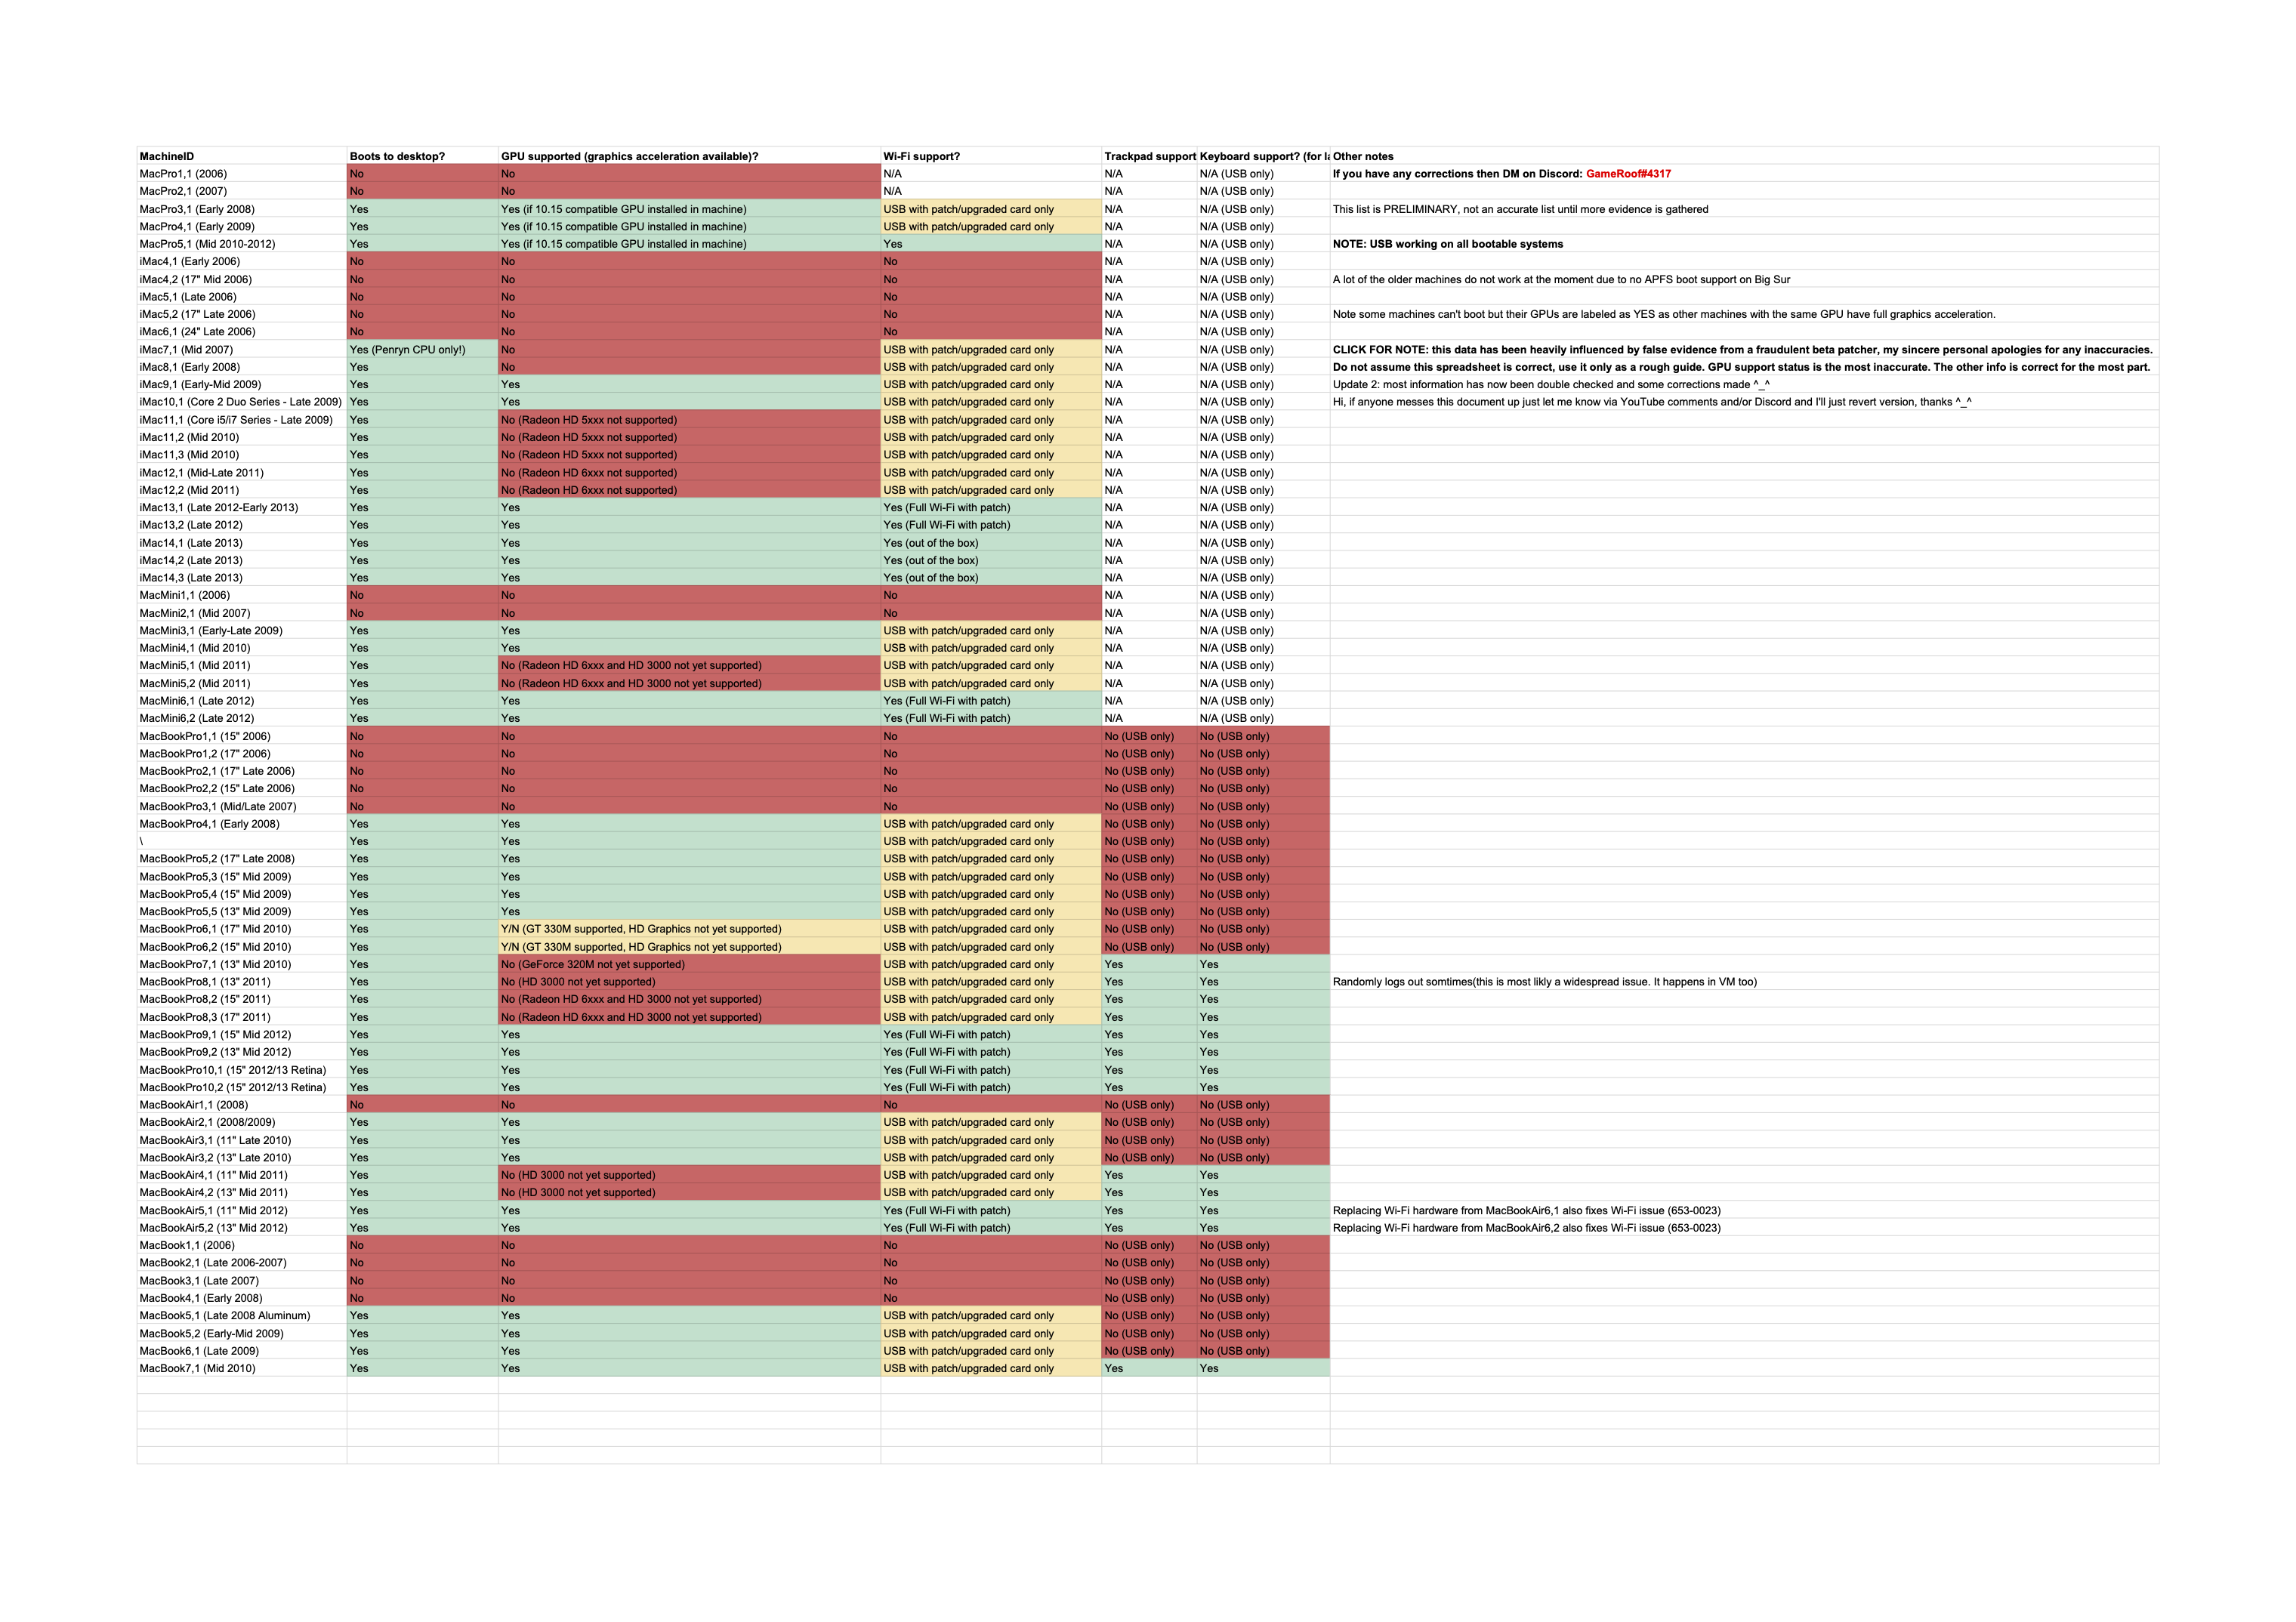
You can click the photo to zoom it, or Click Here to look up the chart. The situation may be changed in the future.
- Patcher working status
Click here to get info.
Installation
What we need
- macOS Big Sur Disk Image(.dmg)
- micropatcher(Click here to download)
- An external usb drive(at least 16 GB)
Why can’t we directly install it?
Installation disk will get your Mac’s motherboard ID and device ID, then judget whether it’s a supported device.
So directly install will cause BIErrorDomain 3 error, and Big Sur installation disk will stop you to install it.
Here we go
Create a bootable installer for macOS(view official tutorial from apple here)
Download this micropatcher, then run
micropatcher.shto patch the USB stick. (If you are viewing this on GitHub, and you probably are, then click “Clone” then “Download ZIP”.) If the USB stick has been renamed ormicropatcher.shis otherwise unable to find the USB stick, then try specifying the pathname of the USB stick tomicropatcher.sh. The easiest way to do that is to open a Terminal window, drag and dropmicropatcher.shinto the Terminal window, go back to Finder, choose Computer from the Go menu, drag and drop the USB stick into the Terminal window, then press Return.Since Disk Utility in Big Sur may have new bugs, this may be a good time to use Disk Utility in High Sierra/Mojave/Catalina to do any partitioning or formatting you may need.
Boot from the USB stick.(Re/start your mac and immediately long-press
option, then choose the Installation Disk)If you need to do any partitioning or formatting with Disk Utility, and you didn’t do it in step 5, it’s best to do it now.
Open Terminal (in the Utilities menu), then run
/Volumes/Image\ Volume/set-vars.sh. This script will change boot-args and csrutil settings as needed, and also set things up so the Installer will run properly. Don’t forget that tab completion is your friend! You can type/V<tab>/I<tab>/se<tab>at the command prompt – that’s much less typing! (Run/Volumes/Image\ Volume/set-vars.sh -vinstead if you want verbose boot, which can be very useful for troubleshooting.)Quit Terminal then start the Installer as you would on a supported Mac.
Come back in an hour or two and you should be at the macOS setup region prompt! (If you actually watch the installation process, don’t be surprised if it seems to get stuck at “Less than a minute remaining…” for a long time. Allow it well over half an hour. It should eventually reboot on its own and keep going.)
If you’re on a Late 2013 iMac, or you’ve replaced the 802.11n card in your 2012/2013 Mac with an 802.11ac card, you’re done. Otherwise, press Command-Q and wait a few seconds, then the Setup Assistant should let you shut down. After you shut down, start up again and boot from the patched installer USB again, then open Terminal again. This time, run
/Volumes/Image\ Volume/patch-kexts.sh /Volumes/<name of Big Sur volume>, for example/Volumes/Image\ Volume/patch-kexts.sh /Volumes/Macintosh\ HD. It needs to be the name of the system volume. This will patch your Big Sur installation to add working Wi-Fi. (On 2011 MacBook Pro 13” and 2011 MacBook Air, add a “–2011” option after the “.sh” and before the volume name, for example/Volumes/Image\ Volume/patch-kexts.sh --2011 /Volumes/Macintosh\ HD, to fix sound, brightness control, and sleep as well as Wi-Fi. If you’re going to use the installation on a 2010 or older Mac, add a “–all” option likewise.) As of patcher v0.0.18, it is now possible to do this step without booting from the patched installer USB – just open Terminal and run/Volumes/Install\ macOS\ Big\ Sur\ Beta/patch-kexts.shwith any command line options if needed (such as/Volumes/Install\ macOS\ Big\ Sur\ Beta/patch-kexts.sh --2011), but do not specify a volume name and patch-kexts.sh will automatically default to the boot drive.If you will be using the Big Sur installation on a different Mac (for instance, installing on a 2011 or later Mac and using it on a 2009 or 2010 Mac), it is possible that the other Mac (the one not used for installation) may try to boot off the wrong APFS snapshot. To prevent this, run zap-snapshots.sh on your System volume, to remove all but the most recent snapshot. For instance,
/Volumes/Image Volume/zap-snapshots.sh /Volumes/Macintosh\ HD. (Or you can also do this if you are running low on disk space.) This is basically the same as step 9, but withzap-snapshotsinstead ofpatch-kexts, and without any command line options like--2011or--all.After step 9 (and 10 if necessary), reboot into your Big Sur installation.
On 2011 and older Macs, once you have installed Big Sur, make sure to enable Reduce Transparency to eliminate many seemingly random crashes, and if icons on the right-hand side of the menu bar are invisible afterward, try Dark mode. (If you will be using the installation on a 2009/2010 Mac, it would be a good idea to finish the Setup Assistant on a 2011 or later Mac and enable Reduce Transparency before moving the installation over.)
(only for 2008 Mac Pros & 2010 or earlier models of other Macs) Before you move the installation over from a newer Mac, you need to set nvram variables. Normally this would be done by the set-vars.sh script in step 6, but you ran that script on a different Mac because the patched installer USB either will not boot on your Mac or will not provide a functioning keyboard/mouse/trackpad on your Mac. To set the nvram variables on the older Mac, first boot into the installer USB or DVD for OS X Mavericks (10.9.5) or older. Yosemite (10.10) and later will not work! Then open Terminal and run the following commands (pay attention to zero vs. 8 – it’s ‘w%08%00%00’):
nvram csr-active-config='w%08%00%00'
nvram boot-args="-no_compat_check"
To update from one beta to the next, it should be possible to create a USB for the new beta (using createinstallmedia), patch it with this patcher, then follow the directions above (except skip Disk Utility, i.e. skip steps 3 and 5) to boot from the patched USB and install it on top of the previous beta. (Allow something like 1-3 hours for the update, even if it looks like it froze up at some point, especially on a 2011 or older Mac.) This will uninstall the Wi-Fi, etc. kexts that were installed in step 9 on the previous beta, so you will need to redo that step as well. Perhaps someone will find a more convenient update method, but in the meantime, this method should suffice. This method has been tested for updating from beta 1 to beta 2 and from beta 2 to beta 3.
If you want to undo the patcher’s changes to boot-args and csrutil settings, then boot from the USB stick, open Terminal, and run /Volumes/Image\ Volume/reset-vars.sh. For what it’s worth, there is also a script for undoing the kext additions (such as 802.11n Wi-Fi), at /Volumes/Image\ Volume/unpatch-kexts.sh. (It is dependent on implementation details of patch-kexts.sh and may not be able to undo kext changes applied through other means. A more time-consuming but more thorough alternative is to reinstall Big Sur on top of your existing installation, as if you were using the method described in the previous paragraph to update to a new Big Sur beta.)
The best way to remove the patch from the USB stick is to redo createinstallmedia, but if you are working on patcher development or otherwise need a faster way to do it, you can run unpatch.sh.
Rollback
Since you’ve taken snapshots by Time Machine, it’s really easy to rollback.
Just re/start your mac and immediately long-press option, then choose Time Machine, Restore.
References:
big-sur-micropatcher https://github.com/barrykn/big-sur-micropatcher
macOS 11.0 Big Sur working status by Gustra https://docs.google.com/spreadsheets/d/1cLnQ6tutP8rk0_Le_dsMH7TKBmDiAe30hsJ4kfprfNY/edit#gid=0
How to create a bootable installer for macOS https://support.apple.com/en-us/HT201372
install_url to use ShareThis. Please set it in _config.yml.